
Happy Saturday everyone,
I like do craft such as cross stitch,beading, chinese knot etc in my passtime. I felt exited when i saw this contest as i could share with you one of my favourite pastime i.e Chinese knot.
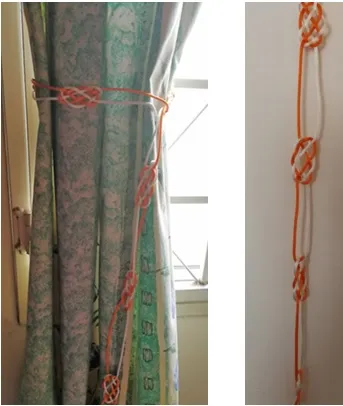
Below would be the process on how to make Chinese Knott Curtain tie-back. In this tutorial, I used 2 different colour (white and Orange) string for easier explanation. You could change the string colour to match your curtain. You can change the thickness of the string as well.
The tie-back does not match my curtain because i only have these 2 Chinese strings to perform the tutorial.
Tools:
Pins – to position the string
Chinese knot String. (Colour and thickness of your choice)
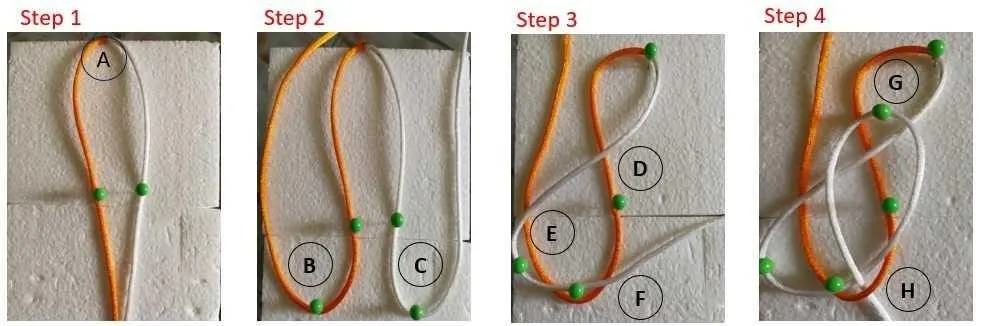
Step 1: I have burned the end of each string and combined them together as shown in “A”. Arranged the string as shown in Step 1 image. I used 2 pins to fix the position.
Step 2: Turn the strings become W shape. Fixed point “B” and “C” using pins. White String (Right Side of the image) ~Step 3: We worked on White string first by place it on top of Orange string as in “D”. Then adjust and position the white string on top of Orange string as “E” and “F”.
Step 4: Now made the white string an n shape in “G”. I normally used a pin to fix the position. Then place it underneath Orange String as in “H”
 Orange String (Left side of the image), it more complicated than white string. ~
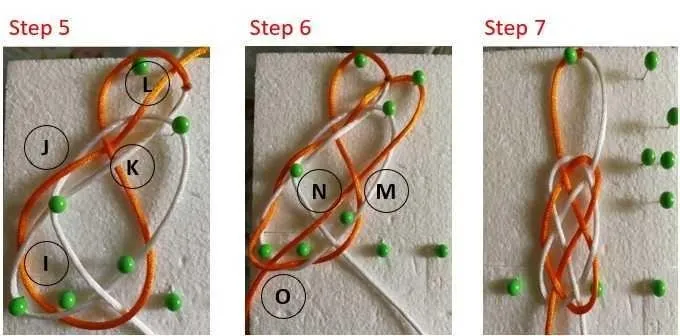
Step 5: As shown in “I”. Position both White and Orange String properly, place the Orange string underneath of White string.
In “J”, then turn the Orange string on top of white string, then below the Orange string as in “K”. This Orange string must be in between of White string as shown in “K”.
Then in “L”, place the Orange string underneath the center again.
Step 6: We almost done with one knot. We then position the string toward us after “K” as an n shape and place it under the Orange string again as in “M”. Reminder: this also in between of both white string. After that, place it on top of White string “N”.
Now the final step, pull the string underneath the Orange string again as in “O ”.
Step 7: Release all the pins and adjusted the knot a bit so that it similar to step 7 image.
Now, you have finished one knot, it depends how long the tie-back you need, you can continue to do the similar knot until your desired length. In this tutorial, I have prepared a 7-knot tie-back. You also could adjust the length between 2 knots, it very flexible.
This is an Invitation to join #ccc for [Guaranteed 👍 Daily Income 💵 and Payout
💸 for Newbies (2.0) 🐟 🐜 🐛 in #ccc 👣 and Follow
👣 the Honor Code 🏅 - the Creed (Conditions and Limits Inside)(@freedomshift/guaranteed-daily-income-and-payout-for-newbies-
2-0-in-ccc-and-follow-the-honor-code-the-creed-conditions-and-limits-inside)
AND
the latest update <<< please click to read.